Context API
by Frinee
이 글은 코딩테스트에서 Context API를 사용한 문제를 마주하여 좌절하게 된 후,
궁금증이 생겨 Context 방식에 대해서 알아보게 되었습니다. 🤣
저는 props나 Zustand를 활용해서 각자 다른 컴포넌트에 데이터를 전달하는 방식만 알고 있었습니다..
그런데 웬 느닷없는 context 가 나왔는지 모르겠네요..
이게 왜 나왔고 필요한지에 대해서 적어봤습니다.
Context를 사용해 데이터를 깊게 전달하기
- 보통의 경우는 부모 컴포넌트에서 자식 컴포넌트로 props를 통해 정보를 전달한다.
- 하지만 중간에 많은 컴포넌트를 거쳐야 하거나, 많은 컴포넌트에서 동일한 정보가 필요한 경우 props를 전달하는 것이 번거롭고 불편해진다.
- context는 부모 컴포넌트가 트리 아래에 있는 모든 컴포넌트 깊이에 상관없이 정보를 명시적으로 props를 통해 전달하지 않고도 사용할 수 있게 해줌.
Props 전달하기의 문제점
- props는 UI 트리를 통해 해당 데이터를 사용하는 컴포넌트에 명시적으로 데이터를 전달하는 훌륭한 방법이다.
- 하지만 이 방식은 어떤 prop을 트리를 통해 깊이 전해줘야 하거나 많은 컴포넌트에서 같은 prop이 필요한 경우에 장황하고 불편함.
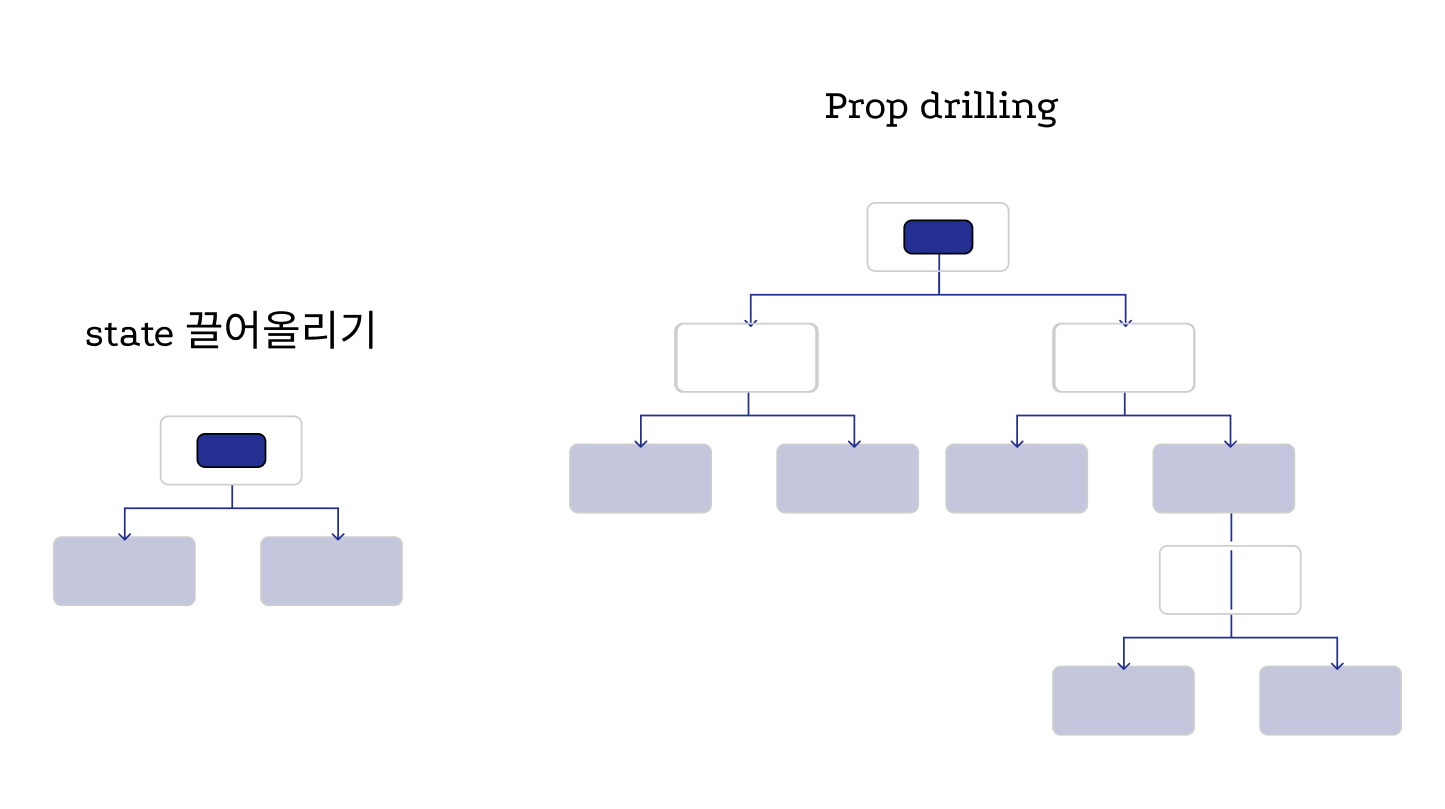
- 데이터가 필요한 여러 컴포넌트의 가장 가까운 공통 조상은 트리 상 높은 위치할 수 있고 그렇게 높게까지 state를 끌어올리는 것은 Prop drilling 현상을 초래할 수 있음.
- Prop drilling: 부모 컴포넌트가 자식 컴포넌트로 데이터를 전달하기 위해 props를 사용하는 과정에서, 직접 데이터를 필요로 하지 않는 중간 컴포넌트들도 데이터를 전달하는 역할만을 하게 되는 문제
Context: Props 전달하기 대안
Context는 부모 컴포넌트가 그 아래의 트리 전체에 데이터를 전달할 수 있도록 해줌.
예시로 크기 조정을 위해 level을 받는 Heading 컴포넌트를 본다면,,
- App.js
import Heading from './Heading.js';
import Section from './Section.js';

export default function Page() {
  return (
    <Section>
      <Heading level={1}>Title</Heading>
      <Heading level={2}>Heading</Heading>
      <Heading level={3}>Sub-heading</Heading>
      <Heading level={4}>Sub-sub-heading</Heading>
      <Heading level={5}>Sub-sub-sub-heading</Heading>
      <Heading level={6}>Sub-sub-sub-sub-heading</Heading>
    </Section>
  );
}- Section.js
export default function Section({ children }) {
  return (
    <section className="section">
      {children}
    </section>
  );
}- Heading.js
export default function Heading({ level, children }) {
  switch (level) {
    case 1:
      return <h1>{children}</h1>;
    case 2:
      return <h2>{children}</h2>;
    case 3:
      return <h3>{children}</h3>;
    case 4:
      return <h4>{children}</h4>;
    case 5:
      return <h5>{children}</h5>;
    case 6:
      return <h6>{children}</h6>;
    default:
      throw Error('Unknown level: ' + level);
  }
}
같은 Section 내의 여러 제목이 항상 동일한 크기를 가져야 한다고 봤을 때 각각 <Heading>에 level prop을 전달함.
<Section>
  <Heading level={3}>About</Heading>
  <Heading level={3}>Photos</Heading>
  <Heading level={3}>Videos</Heading>
</Section>
<Section> 컴포넌트에 level prop을 전달해 이를 <Heading>에서 제거하는 것이 가장 효율적일 것이다. 이렇게 하면 반복적인 코드를 쓰지 않아도 되고 좋을 것 같다.
ex)
<Section level={3}>
  <Heading>About</Heading>
  <Heading>Photos</Heading>
  <Heading>Videos</Heading>
</Section>
가능하게 하기 위해선 <Heading> 컴포넌트가 가장 가까운 <Section> 레벨을 알아야 한다.
그러기 위해선 자식에게 트리 위 어딘가에 있는 데이터를 요청하는 방법이 필요함.
여기서부턴 세 단계로 context를 쓰기 시작한다.
- Context를 생성
// LevelContext.js import { createContext } from 'react'; export const LevelContext = createContext(1); // 1은 가장 큰 제목 레벨 - 데이터가 필요한 컴포넌트에서 context를 사용(Heading 에서 LevelContext 사용)
- React에서 useContext Hook과 생성한 Context를 가져옴
- level props를 제거하고 LevelContext를 읽도록 함
// Heading.js

import { useContext } from 'react';
import { LevelContext } from './LevelContext.js';

export default function Heading({ children }) {
  const level = useContext(LevelContext);
<Section level={4}> <Heading>Sub-sub-heading</Heading> <Heading>Sub-sub-heading</Heading> <Heading>Sub-sub-heading</Heading> </Section> - 데이터를 지정하는 컴포넌트에서 context를 제공(Section 에서 LevelContext 제공)
- Section 컴포넌트는 자식들을 렌더링하고 있음
- LevelContext 를 자식들에게 제공하기 위해 context provider로 감싸준다.
import { LevelContext } from './LevelContext.js';

export default function Section({ level, children }) {
  return (
    <section className="section">
      <LevelContext.Provider value={level}>
        {children}
      </LevelContext.Provider>
    </section>
  );
}
Context는 부모가 트리 내부 전체에, 심지어 멀리 떨어진 컴포넌트에게도 데이터를 제공할 수 있도록 함.
같은 컴포넌트에서 context를 사용하며 제공하기
- 지금은 각각의 section에 level을 수동으로 지정하는데
- Context를 통해 컴포넌트에서 정보를 읽을 수 있으므로 각 Section 은 위의 Section 에서 level 을 읽고 자동으로 level + 1 을 아래로 전달할 수 있음
import { useContext } from 'react';
import { LevelContext } from './LevelContext.js';

export default function Section({ children }) {
  const level = useContext(LevelContext);
  return (
    <section className="section">
      <LevelContext.Provider value={level + 1}>
        {children}
      </LevelContext.Provider>
    </section>
  );
}- 최종적으로 <Section> 과 <Heading> 둘 모두 level 을 전달할 필요가 없음
// App.js

import Heading from './Heading.js';
import Section from './Section.js';

export default function Page() {
  return (
    <Section>
      <Heading>Title</Heading>
      <Section>
        <Heading>Heading</Heading>
        <Heading>Heading</Heading>
        <Heading>Heading</Heading>
        <Section>
          <Heading>Sub-heading</Heading>
          <Heading>Sub-heading</Heading>
          <Heading>Sub-heading</Heading>
          <Section>
            <Heading>Sub-sub-heading</Heading>
            <Heading>Sub-sub-heading</Heading>
            <Heading>Sub-sub-heading</Heading>
          </Section>
        </Section>
      </Section>
    </Section>
  );
}
Context 사용 예시
- 테마 지정: 사용자가 모양을 변경할 수 있는 애플리케이션의 경우 context provider를 앱 최상단에 두고 시각적 조정을 통해 활용할 수 있음
- 라우팅: 대부분 라우팅 솔루션은 현재 경로를 유지하기 위해 내부적으로 context를 사용
- 상태 관리: reducer를 context와 함께 사용하여 복잡한 state를 관리하고 번거로운 작업 없이 멀리 떨어진 컴포넌트까지 값을 전달할 수 있음.
Context 사용 시 단점
- Provider 컴포넌트가 재렌더링 되는 경우,모든 하위 consumer 컴포넌트가 재렌더링되는 문제가 있다.
- 중첩된 Context를 동시에 사용하면 코드가 복잡해지고 가독성이 떨어질 수 있음. 이 경우는 Context 병합 도구나 커스텀 훅을 활용해 중첩을 줄임.
- Context에 의존적인 컴포넌트는 특정 상태를 제공해야만 동작하므로, 컴포넌트를 독립적으로 재사용하기 어려움.
자료
블로그의 정보
프리니의 코드저장소
Frinee